

Increase the stitch length on your sewing machine to the longest possible. I also change the tension on my machine so it isn't so tight. (But remember to change it back for your next project I don't want any hate mail) Then run a baste stitch along the entire raw edge of your binding. Back stitch at one of the ends.
 Now grab your bobbin thread on the opposite end that you backstitched and start gathering. Push all the gathers clear through the strip until your backstitch brings your gathers to a stop. Continue pushing the gathers through until your whole strip is gathered.

 Now tie the strings so your gathers won't come out. Since your strip is already curled pretty well, all you have to do is fold the end under about a half inch so you don't see the raw edge then start winding the strip. Always placing the tail end of the strip behind.
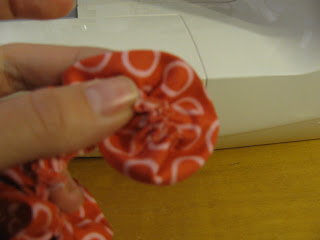

 Once the whole strip is curled you get out your needle and thread and start tacking all the layers into place. I don't think there is a technical way to do this. I just start in the middle and go up and down until I have all the layers held into place. (Make sure you stay pretty close to the center of your flower because we are going to cover the stitches with a covered button.)


Next sew your button on. Then attach it to a hair clip, broach back (I don't know if that is what they are called but you can get them at craft stores), or just sew it on something.

There you have it! Sorry the pictures aren't great but it probably helps you figure it out. Enjoy!


3 comments:
Totally awesome, now I can use that left over bias tape....SWEET!!
thanks for sharing!!
I love this idea! Thank you for doing a tutorial!
Love the idea ... gonna try it today!
Post a Comment